Creating an Email to SMS Gateway using Microsoft 365, Azure Logic Apps and Azure Communication Services


There are a lot of services which offer an Email to SMS Gateway, which converts emails to an SMS message. Generally, the idea is that you send an email containing the message to [phone number in E.164 format]@gateway.domain, for example +61491570006@example.com, and this forwards the text body of the email on as a SMS message.
A couple of the software packages used in my workplace uses this model to send SMS messages, however most Email to SMS Gateway providers charge a base monthly subscription and then require you to pre-purchase SMS credits and due to our usage patterns, this model isn't the most cost effective for us, so I wanted to see if we could achieve the same thing using the tools we already have; Microsoft 365, Azure Logic Apps and Azure Communication Services.
Step 1. Adding a new subdomain in Microsoft 365
The first step is to get Microsoft 365/Exchange Online setup to receive our emails, and there are a few things we need to do to achieve this. As we don't want to setup individual email addresses for each phone number, we'll need to create a catch all email address. A catch all email, as the name suggests, will catch all email that doesn't match any address on an email server. To get this setup, we'll first need to add a new domain to our tenant. This is done through the Microsoft 365 Admin Center by clicking on Settings > Domains > Add Domain (the Microsoft documentation for this is here). I suggest adding a subdomain of your primary email domain for this. I have setup sms-gateway.chrisrowtcliff.com as the domain which I will send the emails to (i.e. +61491570006@sms-gateway.chrisrowtcliff.com).

Step 2. Configuring Exchange Online
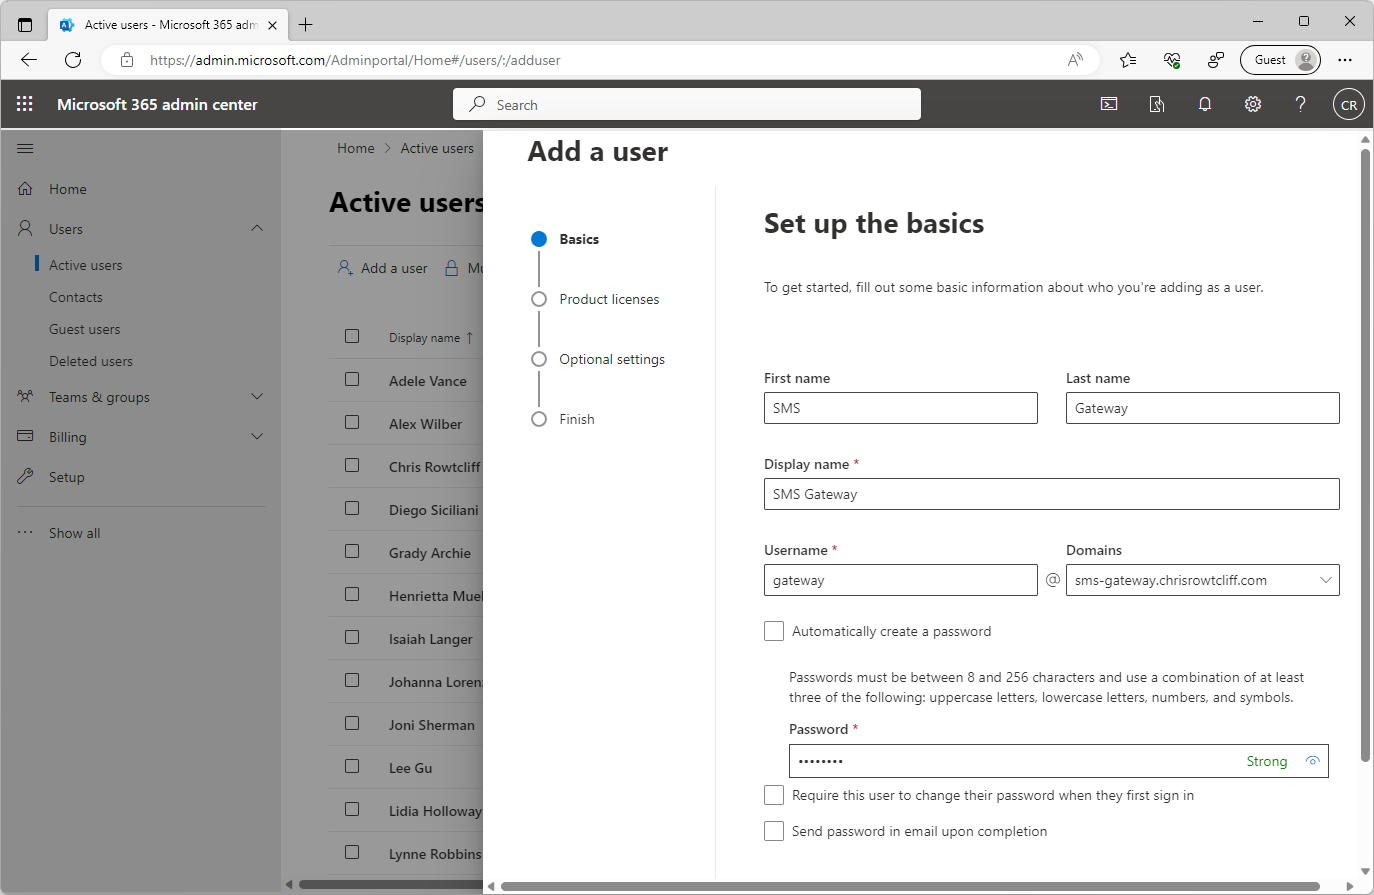
The next step is to create a new mailbox which will receive our emails. I am going to use a standard user mailbox, however a shared mailbox can also be used depending on your requirements.
To do this, navigate to Microsoft 365 Admin Center, and click on Users > Active Users > Add a user, and create a new user under the subdomain that we created earlier. I am using 'gateway@sms-gateway.chrisrowtcliff.com'. Fill in the users' details, select the required licenses, and create the user.
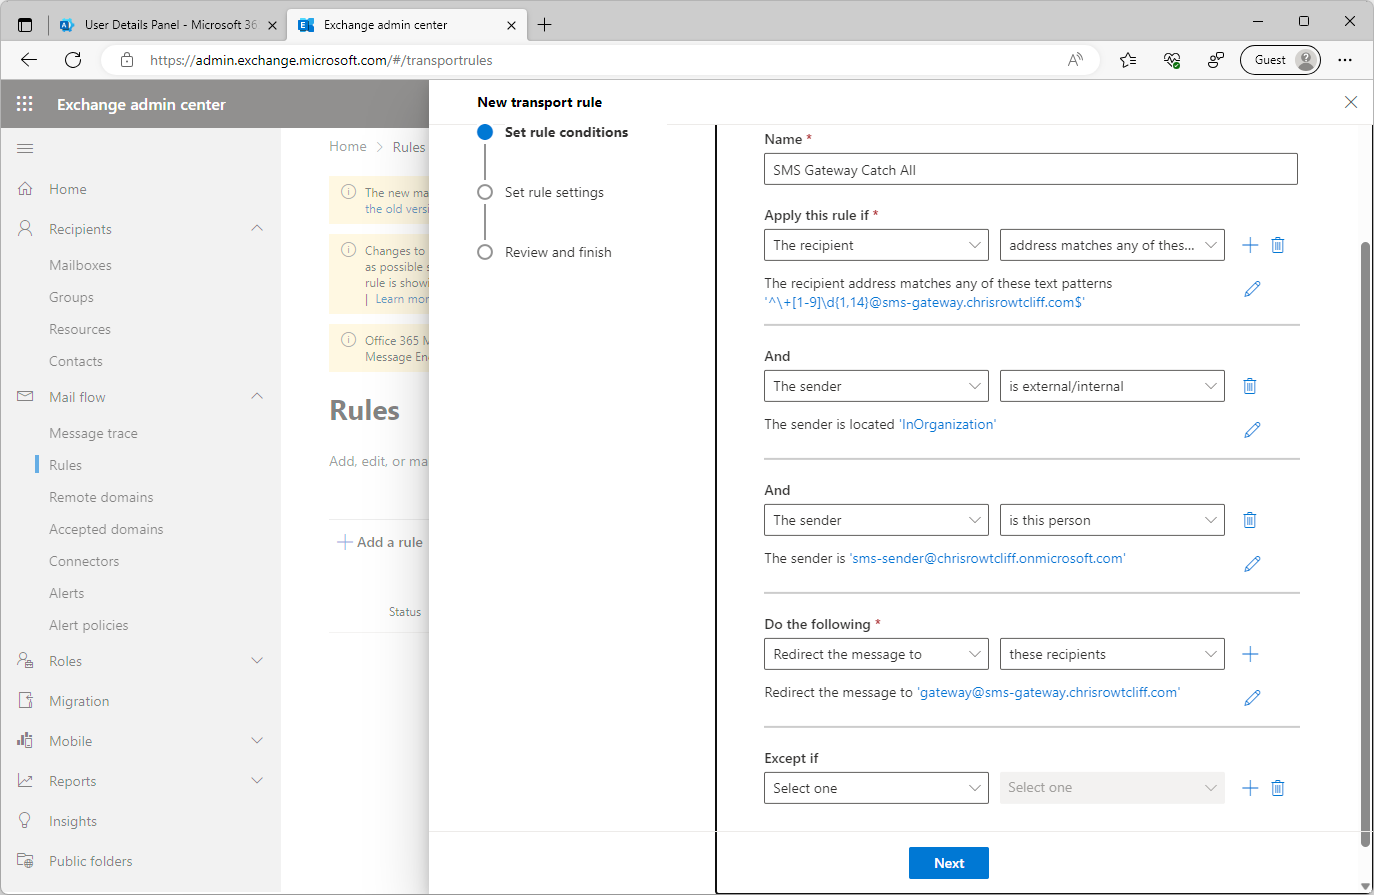
Now we have our catch all domain and mailbox created, we now need to create a transport rule to route all emails sent to the sms-gateway subdomain to the gateway mailbox. To do this, in the Exchange Online Admin Center, click on Mail Flow > Rules. Click on 'Add a rule' > 'Create a new rule' to bring up the rule creation form.
Give your rule a name, such as 'SMS Gateway Catch All', and underneath we can start building out our rules. Under 'Apply this rule if', select 'The recipient' and 'Address matches any of these text patterns'. In this field we can use a regular expression, so enter
^\+[1-9]\d{1,14}@sms-gateway.yourdomain.com$
(replacing the subdomain for your SMS Gateway sub domain), and this will match E.164 formatted numbers. If your software uses localised numbers without the +XX country code, you can also add the following expression to catch those emails too:
^(04)\d{1,14}@.sms-gateway.yourdomain.com$
This will match any number starting with 04, which is the mobile number prefix in Australia. Change the (04) portion to match the prefixes you want to match, or remove it alltogether to match every number between 1 and 14 digits long.
Under 'Do the following' Select 'Redirect the message to' and select your gateway email address, i.e. gateway@sms-gateway.yourdomain.com.
Those are the minimum rules we need, however we can add further to narrow down who this rule applies to, as exposing this email address to external users, or even all internal users could prove risky, and costly!
I have added additional criteria to only apply this rule if users are inside the organisation and is from a dedicated account created to send SMS messages (this can also be a distribution group if you have more than one user you want to enable for this):
Press next, ensure the rules mode is 'Enforce' and 'Stop processing more rules' is selected as we are using a dedicated subdomain, and press next, and then finish to create the rule:

The rule will be created in a 'disabled' state by default, to enable the rule, click the rule and use the 'Enable or disable rule' toggle to enable it:

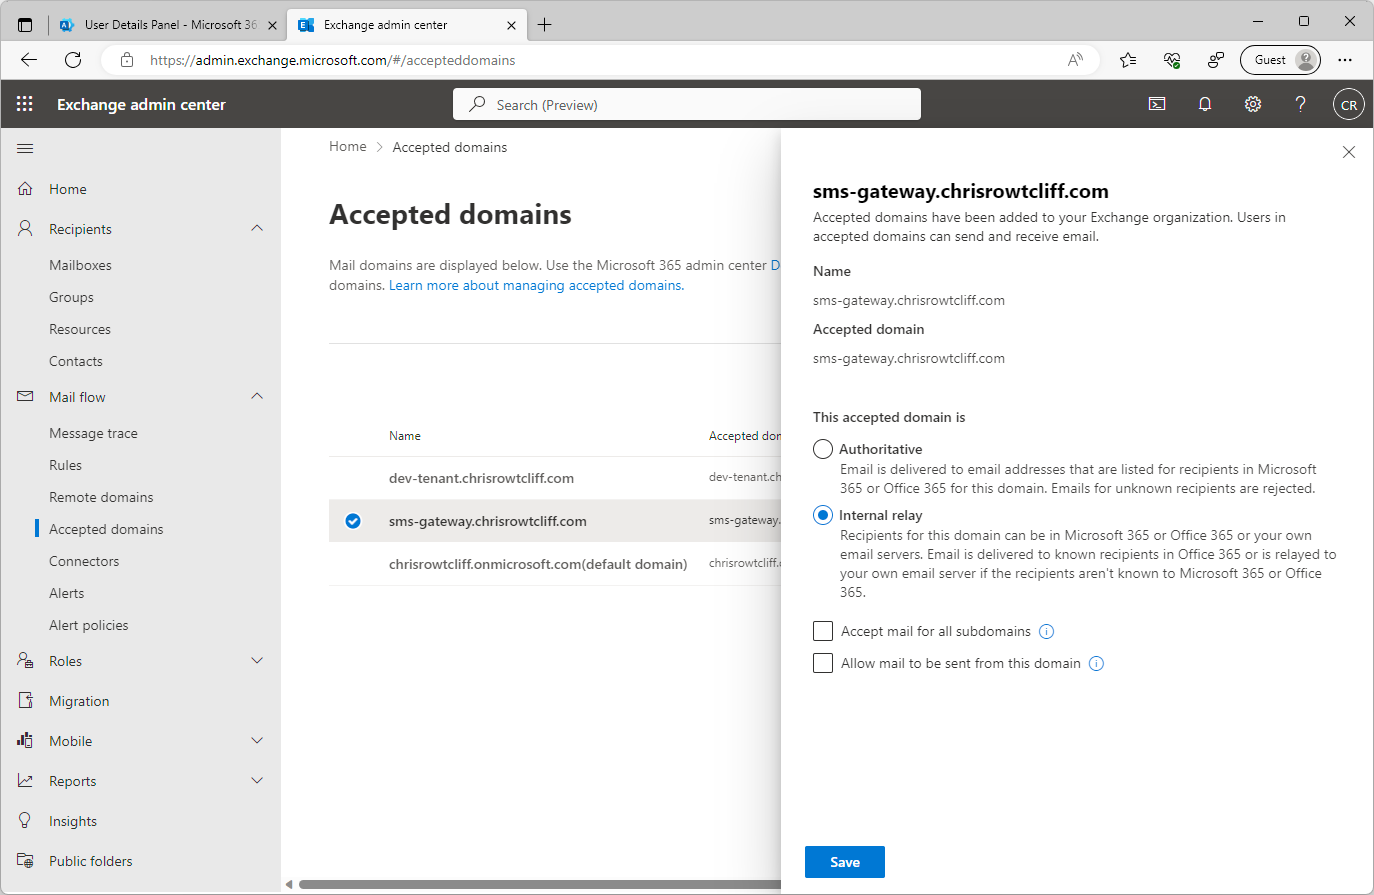
By default, Microsoft 365 will only route mail which is addressed to a valid mailbox and reject all others. This is great for normal use cases, but does mean that our newly created rule won't get processed as mail will be rejected before the rule gets triggered. To change this, in Exchange Admin Center, select Mail Flow > Accepted Domains, select your sms-gateway domain and change the mode from 'Authoritive' to 'Internal Relay'. This will ensure that the rule processes the mail before trying to send it. If the message doesn't match any of the rules, it will be rejected. Make sure 'Accept mail for all subdomains' and 'Allow mail to be sent from this domain' are not selected:
Step 3. Creating a Communication Services resource
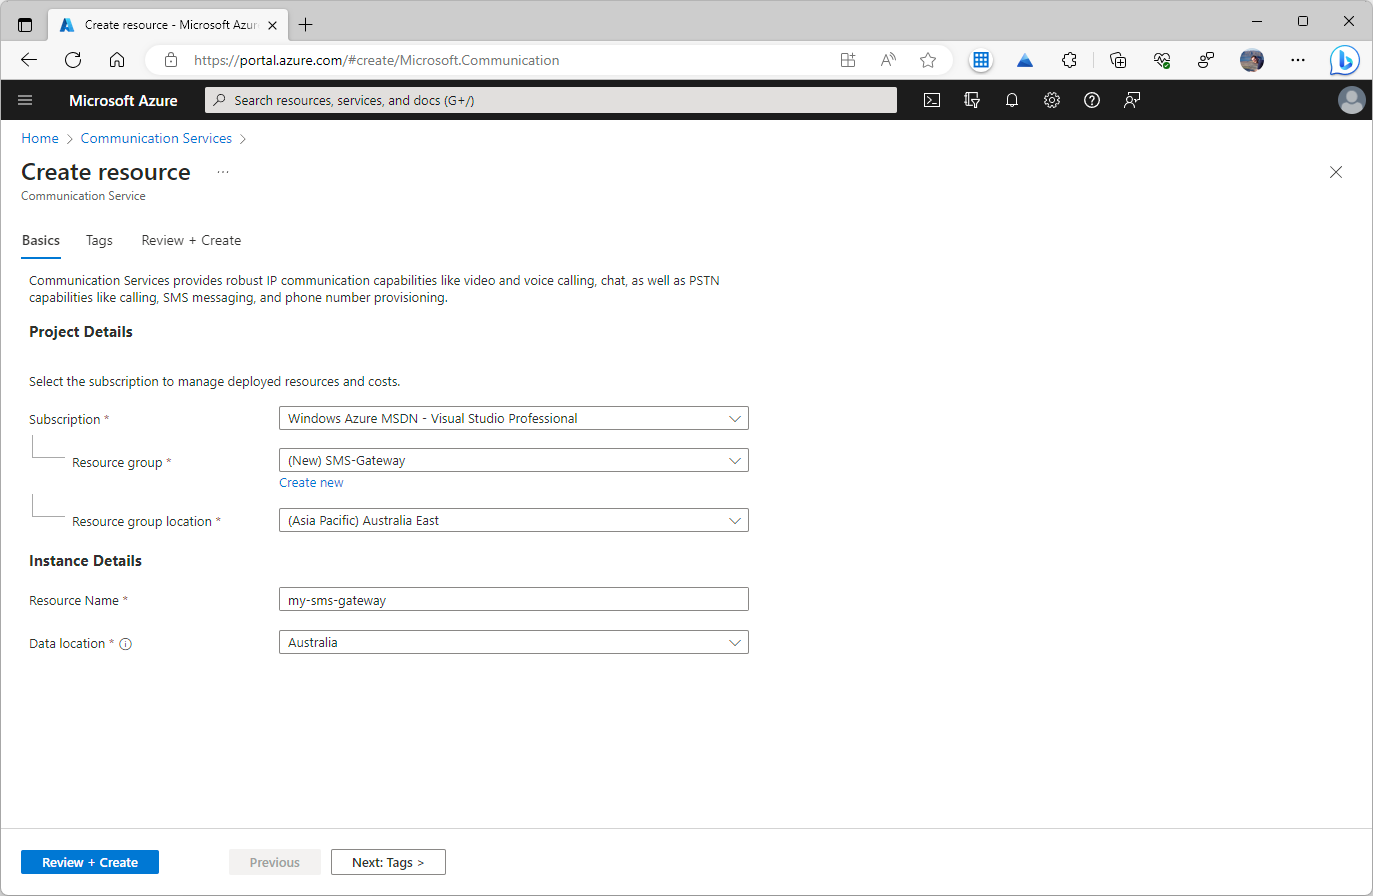
Jump over to the Azure Portal and create a new Communication Services resource, by clicking the 'hamburger icon' in the top right, and then 'Create a resource'. Search for 'Communication Services' and select the Communication Services resource. Fill in the details to create a resource, add any required tags and press 'Create':
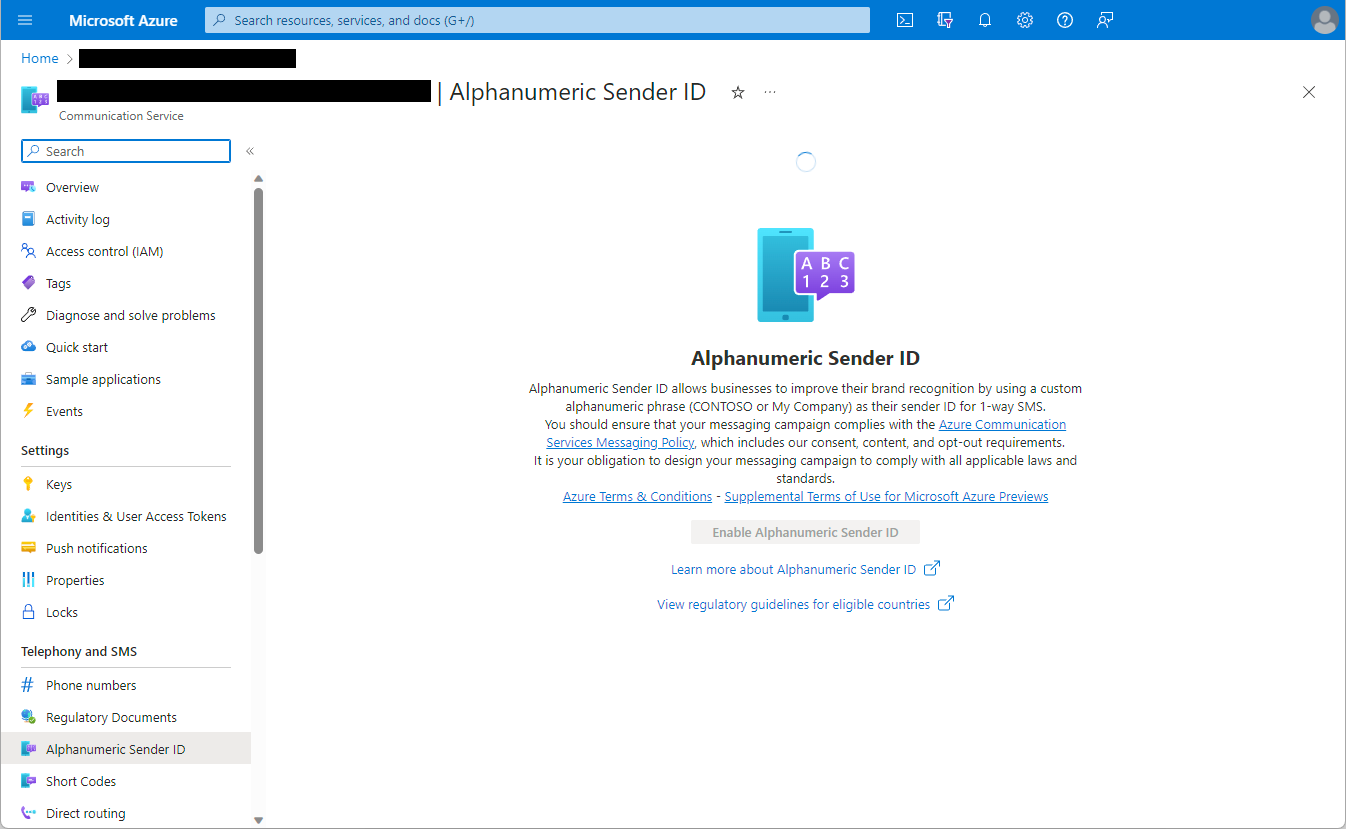
Once the resource has been created, you can either purchase a phone number or shortcode to use, or you can opt to use an 'alphanumeric sender id' which involves no upfront purchase, but does not allow replies to messages from our recipients. As that is what we want in our use case, I'll create a new alphanumeric sender id. To do this, click on 'Alphanumeric Sender ID' and press 'Enable Alphanumeric Sender ID'. Note that at the time of writing, there is a form to fill out to request access to this feature.
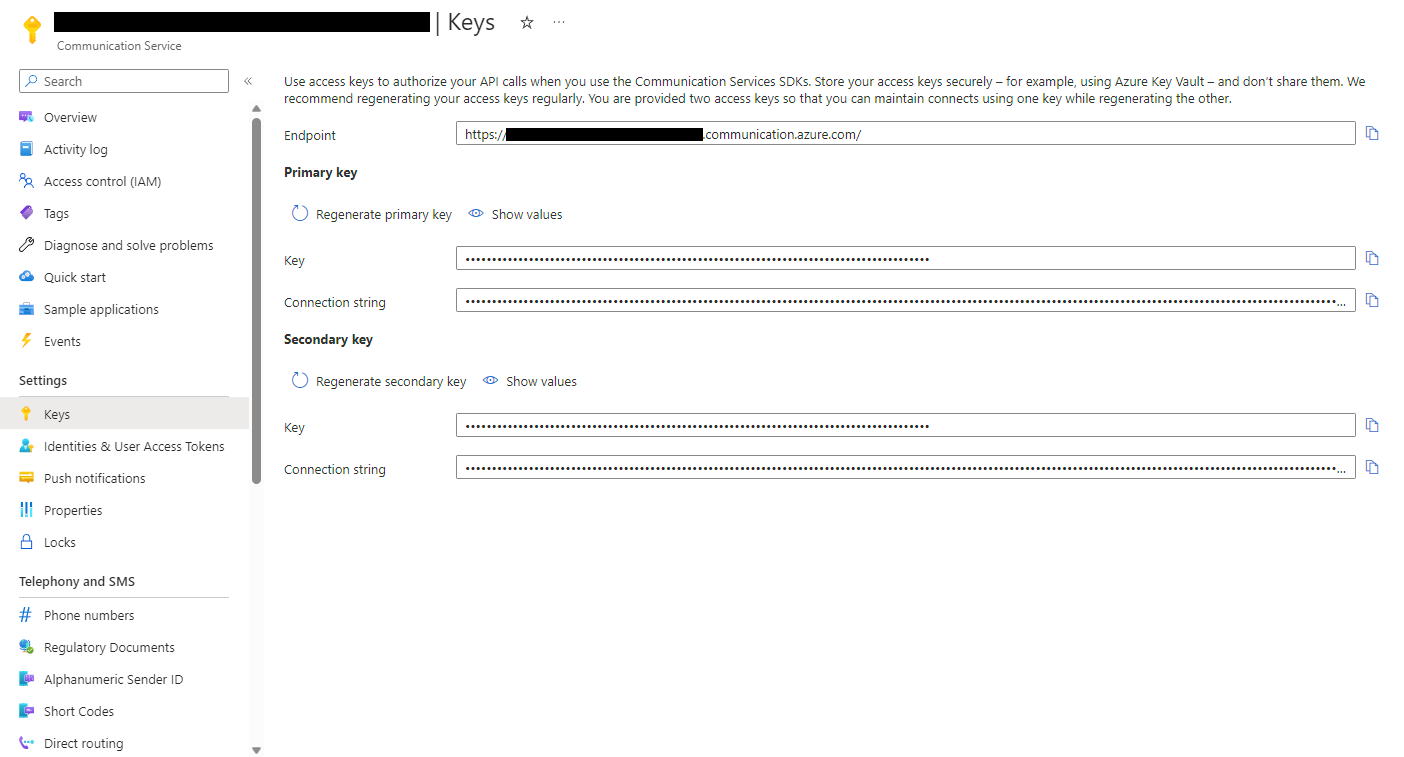
Next, click on 'Settings > Keys' and copy your connection string as we'll need it later to setup the connection from Logic Apps to Azure Communication Services.
Step 4. Tying it all together with a Logic App
Now we have our catch-all email address and our Communication Services setup, we can now get to work creating our Logic App flow to tie the two services together.
The steps we need to take are to setup a trigger for when the email arrives, and then:
- Get the recipient (extract the phone number from the email address)
- Check whether the email is in text format (i.e. not HTML as we don't want to send HTML characters as SMS messages!)
- Check the recipient is a valid
- Extract the body from the email
- Send the SMS message
- Move the email to another folder (or delete it)
To get started, start by creating a new Logic App and selecting a 'Blank Logic App' from the templates:

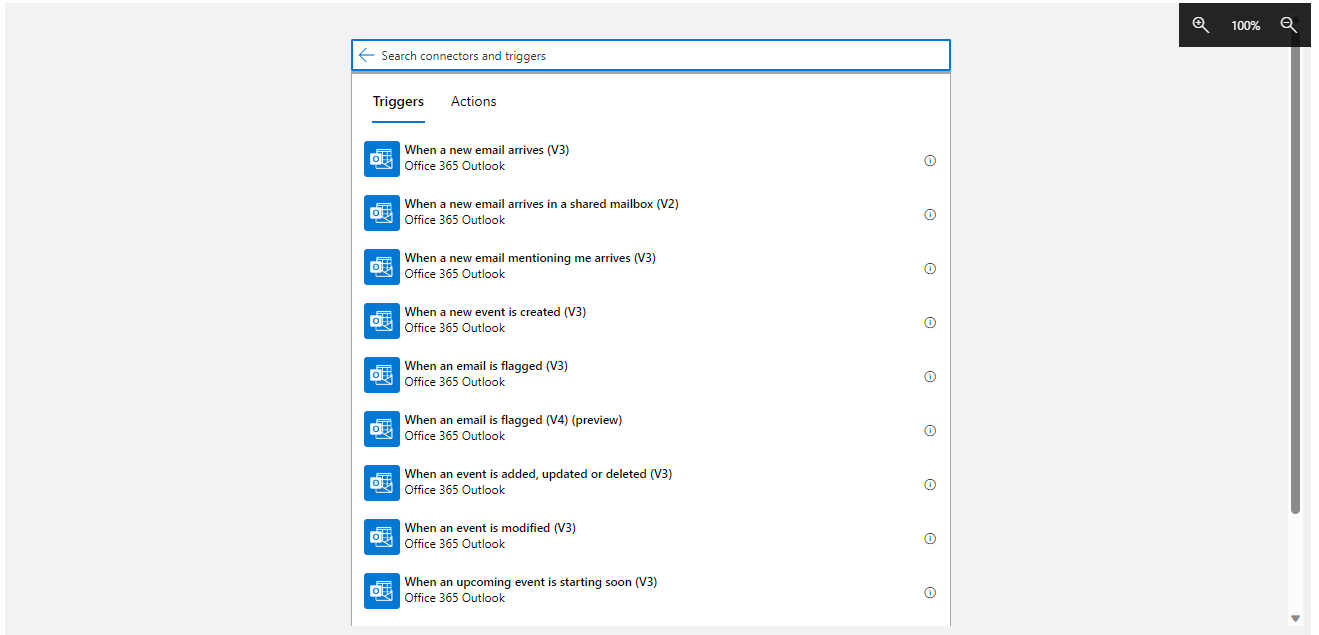
Next, in the designer, add a trigger by searching for 'Office 365 Outlook' and select 'When a new email arrives (V3)'. If you are using a shared mailbox, select 'When a new email arrives in a shared mailbox (V2)':
Sign in using your gateway@sms-gateway.... email address to setup the connection to the mailbox. Leave the options as default, unless you want to add some specific filtering here.
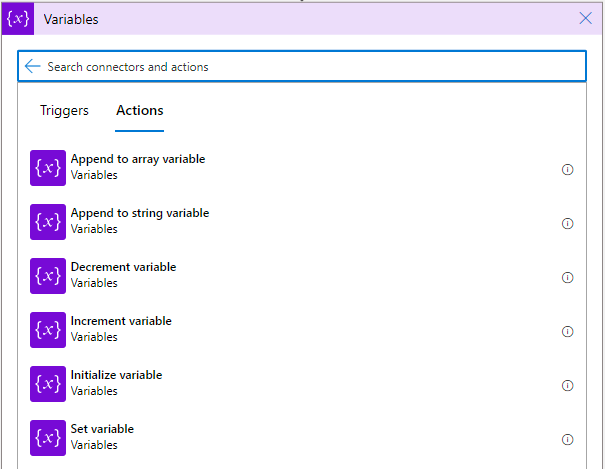
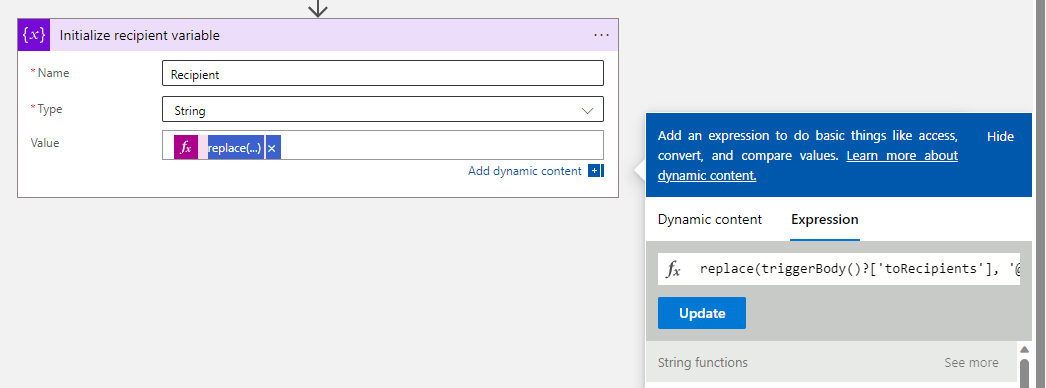
Next, click the '+' button to add a new step and search for 'Variable' and select 'Initialize Variable':
Enter 'Recipient' as the variable name and change the type to string. Under initial value, click on the 'Expression tab' and enter:
replace(triggerBody()?['toRecipients'], '@sms-gateway.yourdomain.com', '')
This will remove the @sms-gateway domain and leave us with just the phone number component of the email address:
Note: if you want to process emails that are sent to localised numbers without the +XX country code (e.g. 0491570006), you'll need to conditionally set the Recipient variable by checking whether the 'To' field starts with a +, and if not, dropping the leading 0 and adding in your country code, such as +61 for Australia.
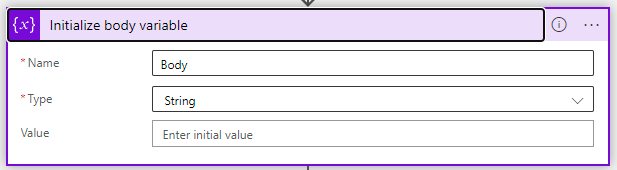
Click the '+' button again and add another 'Initialize variable' step. Name this variable 'Body' and, again, create it as a string, however this time leave the value as blank. We will populate this variable later once we have done some further checks.
Now we want to add a condition check (if/else statement) to check that the email is in plain text format, and perform a very rudimentary check on the phone number.
Click the '+' button again, and search for 'Control'. Select the 'Control' category and select 'Condition'.
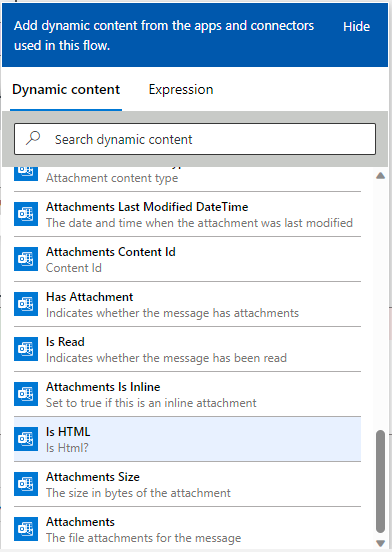
In the first 'Choose a value' field, scroll down the 'Dynamic Content list and select 'Is HTML' under the email values:
Keep the drop down as 'is equal to' and in the second field, enter 'false'.
Click the '+ Add' > Add Row to add another conditional statement, and in the left value field enter the expression:
isInt(variables('Recipient'))
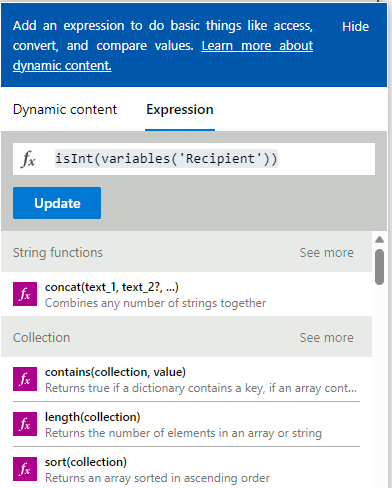
In the right value field enter 'true' to perform a very rough check to ensure that the recipient is an integer (the + character at the beginning of the E.164 formatted phone number is counted as valid).
Your conditional statement field should look like this:
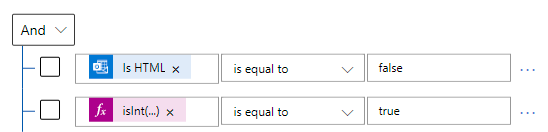
If both of these statements are true, we can go ahead and send the SMS message. If one of these statements is false, we want to skip the sending of the message, so we can lave the 'False' branch empty.
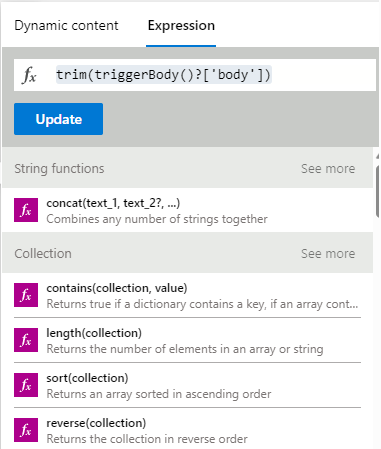
In the 'True' branch of the statement, click the '+' button, search for 'Variables' and select 'Set Variable'. Select 'Body' from the 'Name' dropdown list, click the 'Expression' tab and enter:
trim(triggerBody()?['body'])
This will trim any whitespace from the beginning or the end of the email body.
Next, we have all of our variables set and we can actually now send the message.
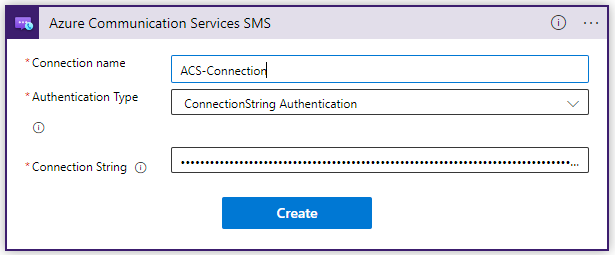
Click the '+' button again, and search for 'Azure Communication Services SMS' (note there are a number of Azure Communication Services categories) and click on 'Send SMS'.
Give your connection a name, select 'ConnectionString Authentication' from the 'Authentication Type' dropdown and paste in the connection string you copied earlier from your Azure Communication Services resource:
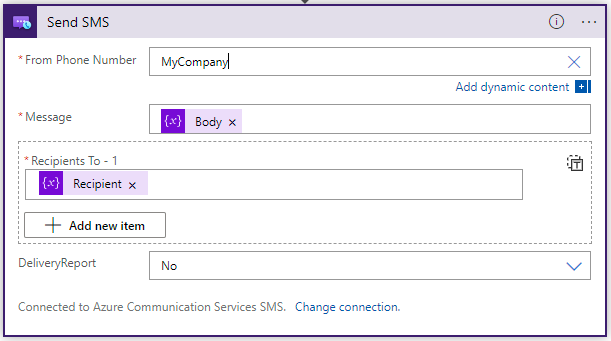
Click create and once the connection has been validated, enter the details for the SMS message. Under 'From Phone Number' enter your alpha numeric ID, or the phone number you purchased in Azure Communication Services, in the Message field select the 'Body' variable and in the 'Recipients To - 1' field, add the 'Receipient' variable.
Finally, we want to move the message to another folder, or delete it. We could do this based on a delivery report, and move the message to either a delivered or undeliverable folder depending on the callback from Azure Communication Services, however, for now, I'll just delete any processed emails.
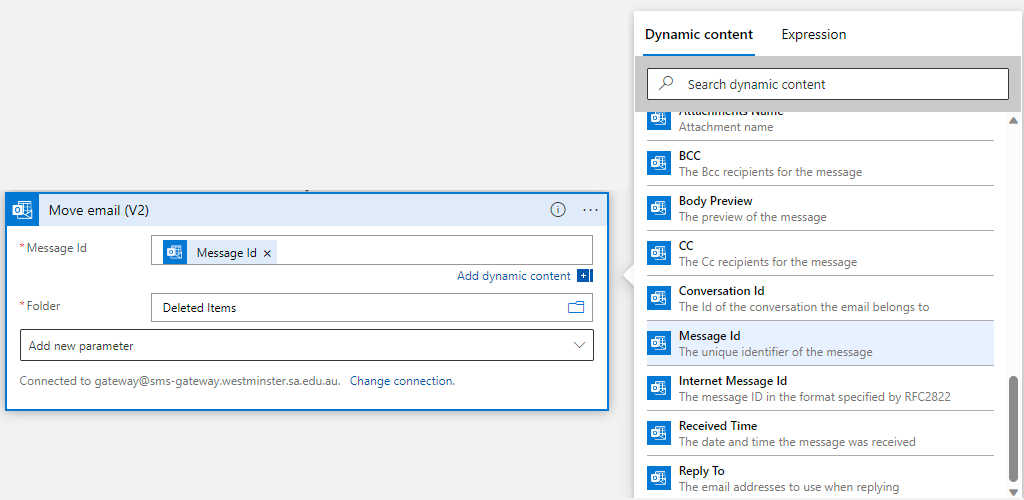
To do this, under the 'True' and 'False' branches, click the '+' button and search again for 'Office 365 Outlook'. Select 'Move email (V2)'. In the 'Message Id' field, select 'Message Id' from the Dynamic Content list, and select the folder that you would like to move the message to.
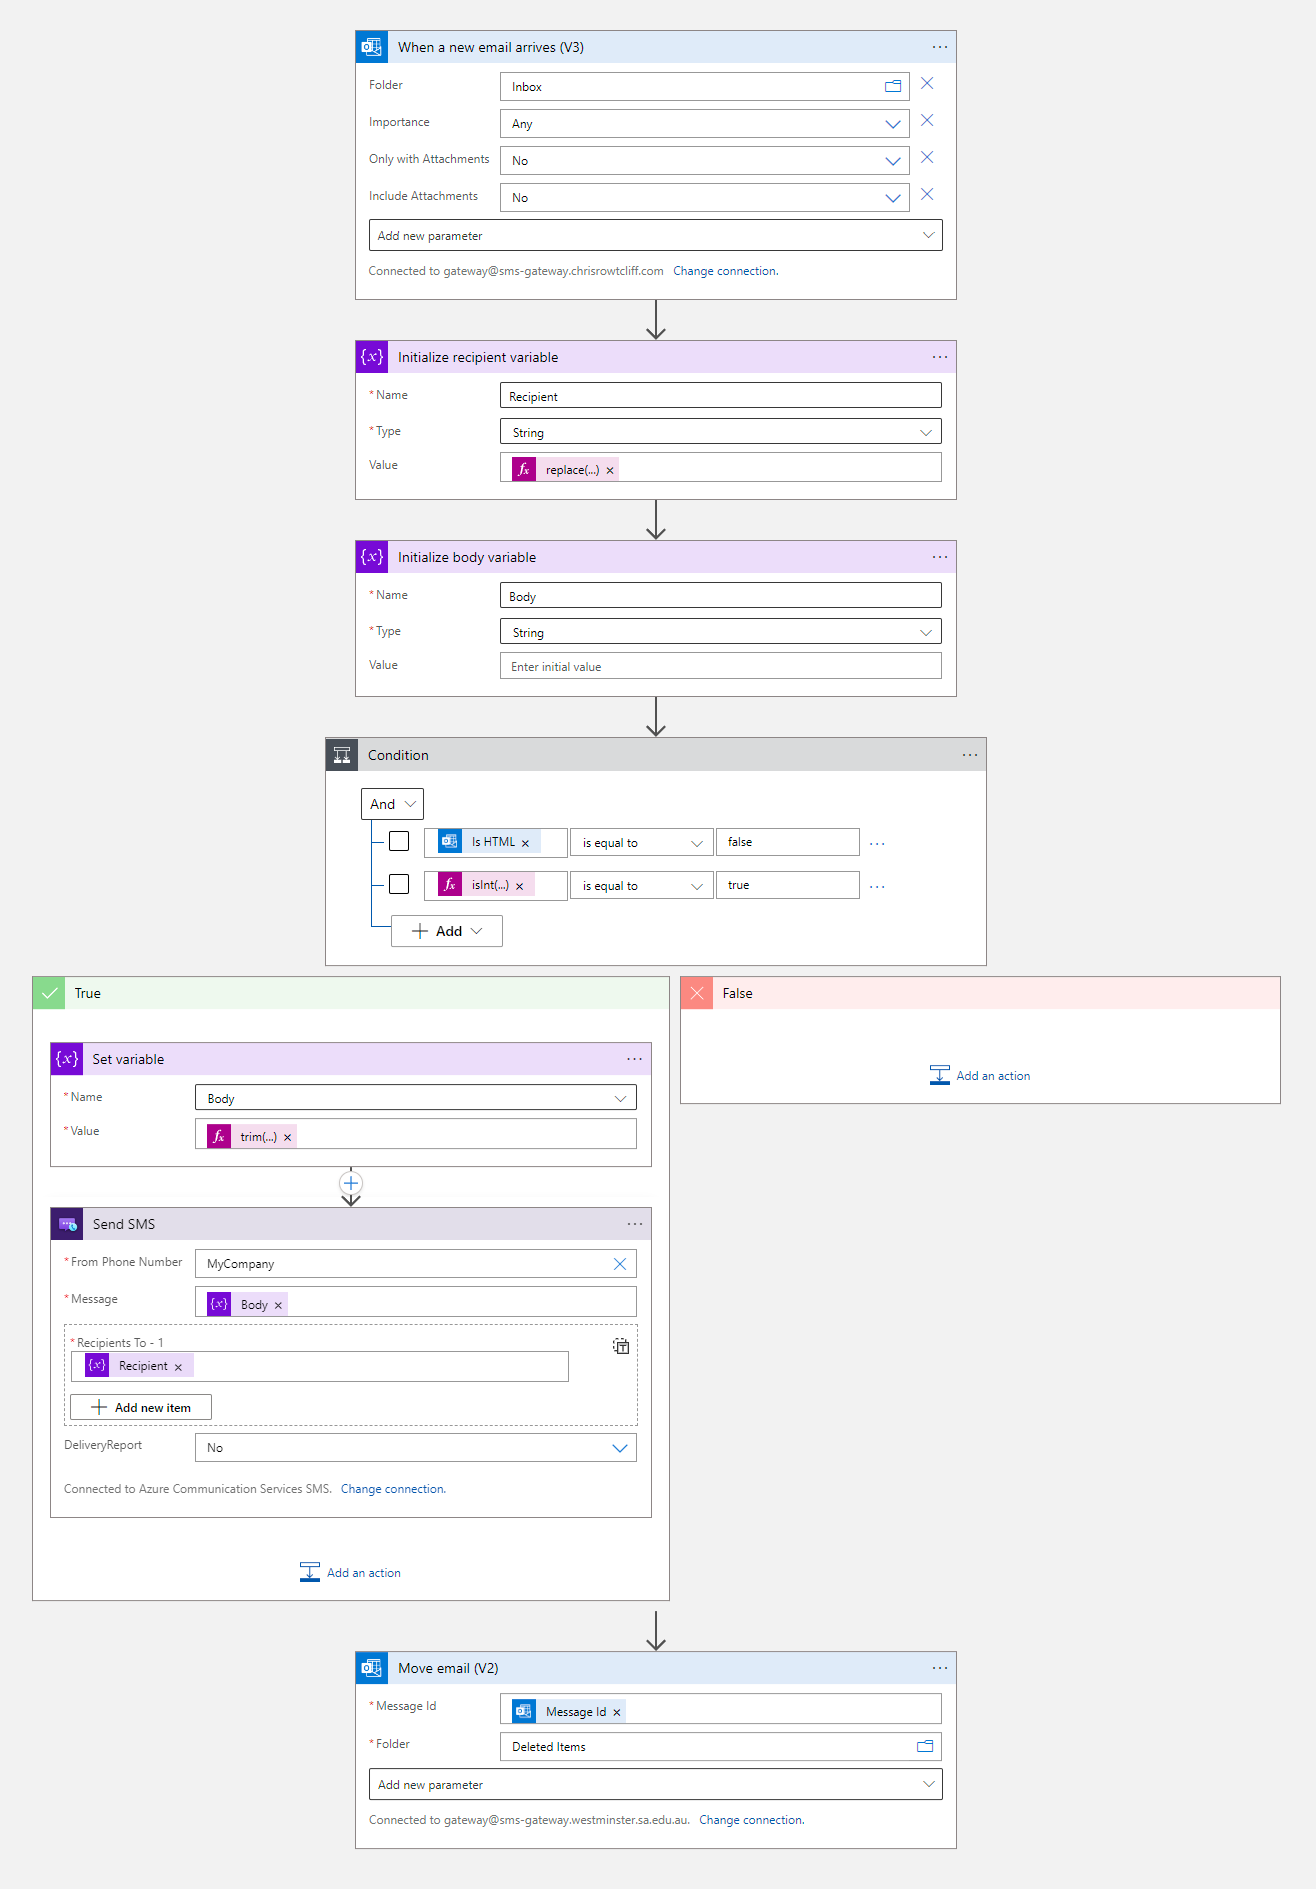
For reference, the entire Logic App workflow looks like this:
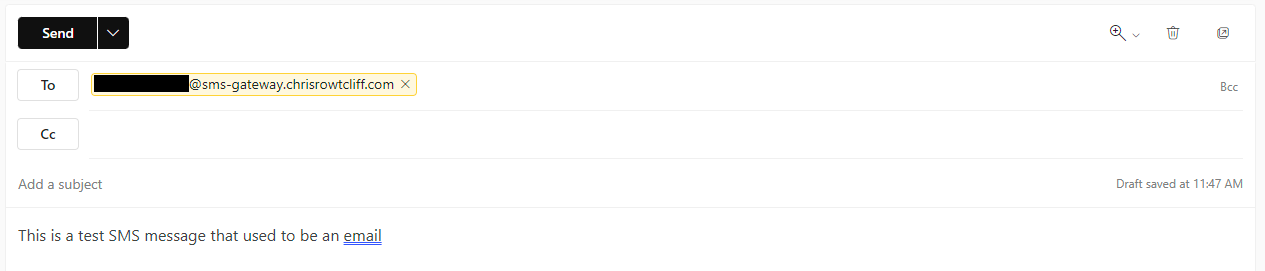
Save your logic app, ensure it is enabled and you are ready to send SMS messages through your own gateway! Sign in to your sms-sender email account that you created earlier, and send an email to [phonenumber]@sms-gateway.yourdomain.com, making sure you send the message in text format and not HTML format (to do this in Outlook Web, when composing an email select the 'Options' tab in the ribbon, and select 'Switch to Plain Text':

Populate the 'To' field and add a test message, and press send:
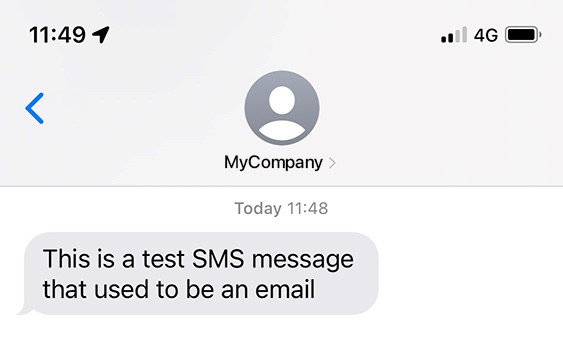
And within a few moments, you should get a SMS message to your phone with the content:
The next steps are to make a logic app which takes the Azure Communication Services callback to record any delivery failures and action them accordingly. We can also setup a logic app to process any 'STOP' or Unsubscribe requests and update our database or send an email to a database administrator to handle these.
Cover photo by Dylan Carr on Unsplash