Using Azure Logic Apps (or Power Automate) to automate Microsoft School Data Sync (SDS)


Microsoft School Data Sync (SDS) is a great tool from Microsoft which you can use to keep your Student Information System (SIS) data, including staff, students, classes and parents to create classes and groups for Microsoft Teams, SharePoint and Intune for Education (amongst other things) in the Microsoft ecosystem.
Microsoft do provide instructions to create a Power Automate Automation to upload existing CSV files to SDS, however I wanted to create the CSV files as part of the automation and not require a separate process to do this. I also wanted to use Logic Apps so that the automation is created outside of a user context and utilised System Assigned Managed Identities. The steps here can be applied to a Power Automate automation too, however as at the time of writing, System Assigned Managed Identities aren't available in Power Automate, so you'll need to create a service account to handle this.
Prerequisites
The Microsoft Power Platform and Logic Apps are able to access on-premises resources through the Microsoft On-premises Data Gateway meaning that we don't need to setup a VPN or any other connection to our database. As we already had the data gateway installed as we use it to query our on-premises SQL Servers from Power BI, we were good to go. If you do not have the data gateway installed, you will need to install it for Logic Apps to be able to access any on-premises resources. If you host your SIS database in the cloud, then you don't need the data gateway and you can give access to your database resource to your managed identity.
The easiest way to query data in the correct format is to create views in your SQL Database which return the data in the correct format for each CSV in the SDS CSV 2.1 Spec. I have created sample Synergetic SQL Scripts which return the data required for our use case here.
Creating the Logic App
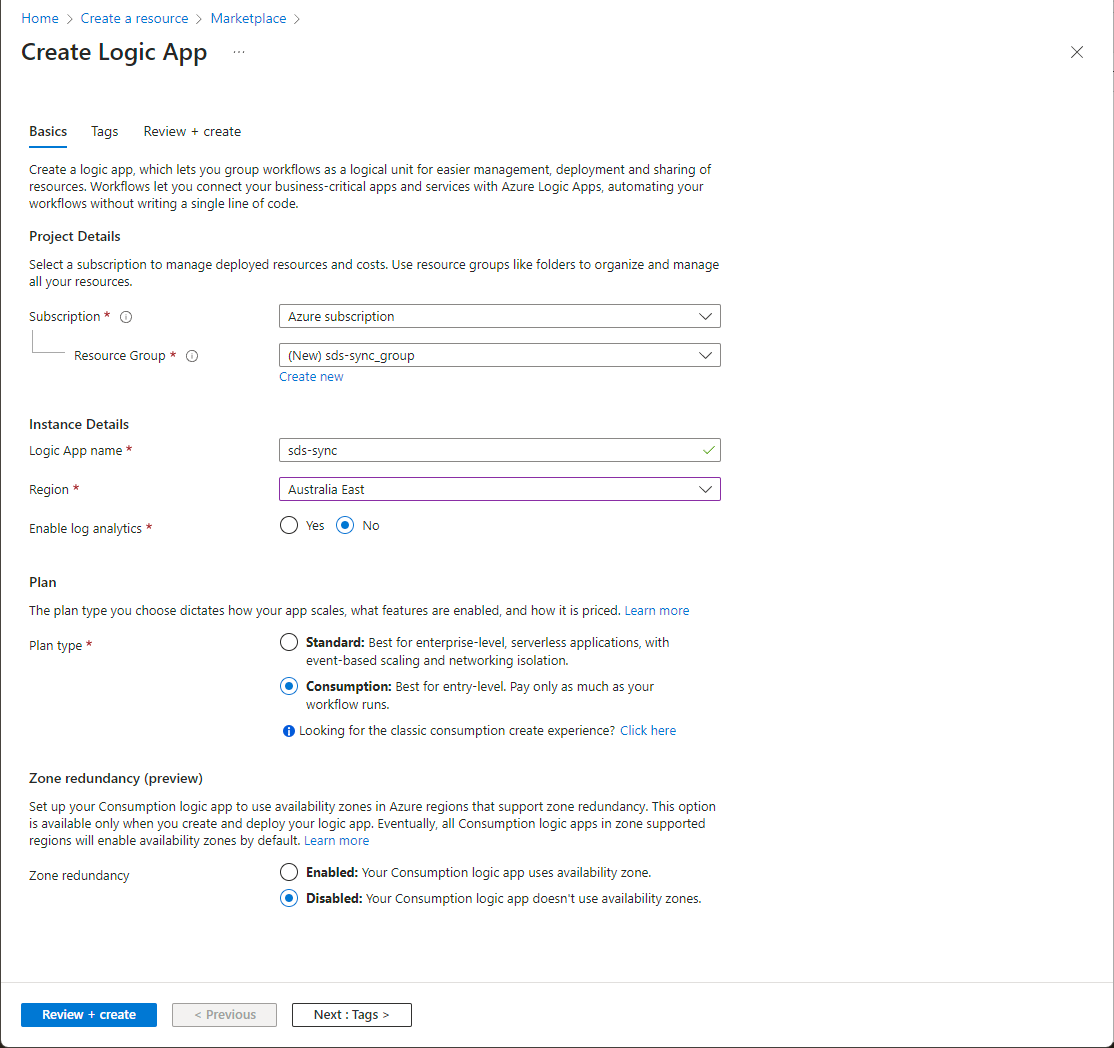
Firstly, we need to start by creating the Logic App. From the Azure Homepage, click 'Create a resource' and search for 'Logic App':

In the search results, select 'Create' underneath the Logic App item:
On the 'Create a Logic App' screen, name your Logic App, select the best Azure Region for your workload, and select consumption mode:
Once the Logic App has been created, you'll be presented with a screen with some quick start templates. From this page, select 'Recurrence' as we'll want to run this automation on a regular time schedule:
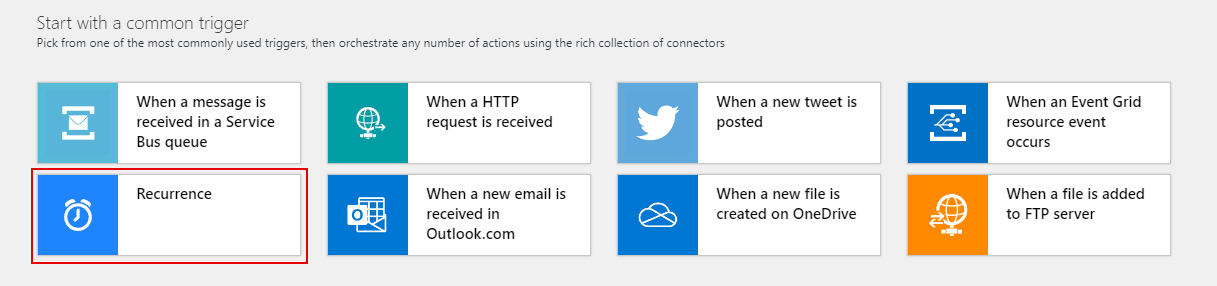
This will create a blank logic app with our recurrence trigger.
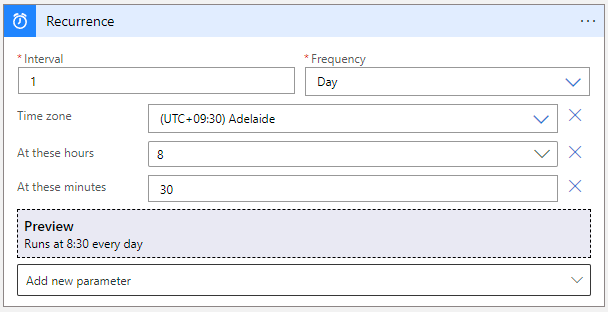
Setup the recurrence trigger to run at the appropriate frequency for your school, you can add more parameters to the trigger by clicking the 'Add new parameter' drop down and selecting them. I have set ours up to run at 8:30am every morning, Adelaide time as that is when most of our Timetable changes have been processed by. It is worth noting that SDS can take a few minutes to sync, depending on your data size, so factor that into the trigger time.
Once we have the trigger set, we can save the Logic App, and now setup a Managed Identity for the Logic App so that the App can authenticate against other Microsoft Resources without the need for a user created service account.
Enable Managed Identity and Assigning Permissions (Logic Apps Only)
One of the advantages to using Logic Apps is the ability to assign a system assigned managed identity to the Logic App which negates the need to manually create a user account.
To enable this for the Logic App, on the left menu, click 'Identity', and set the System Assigned status as 'On'. Press Save and after a few moments, this will be set:
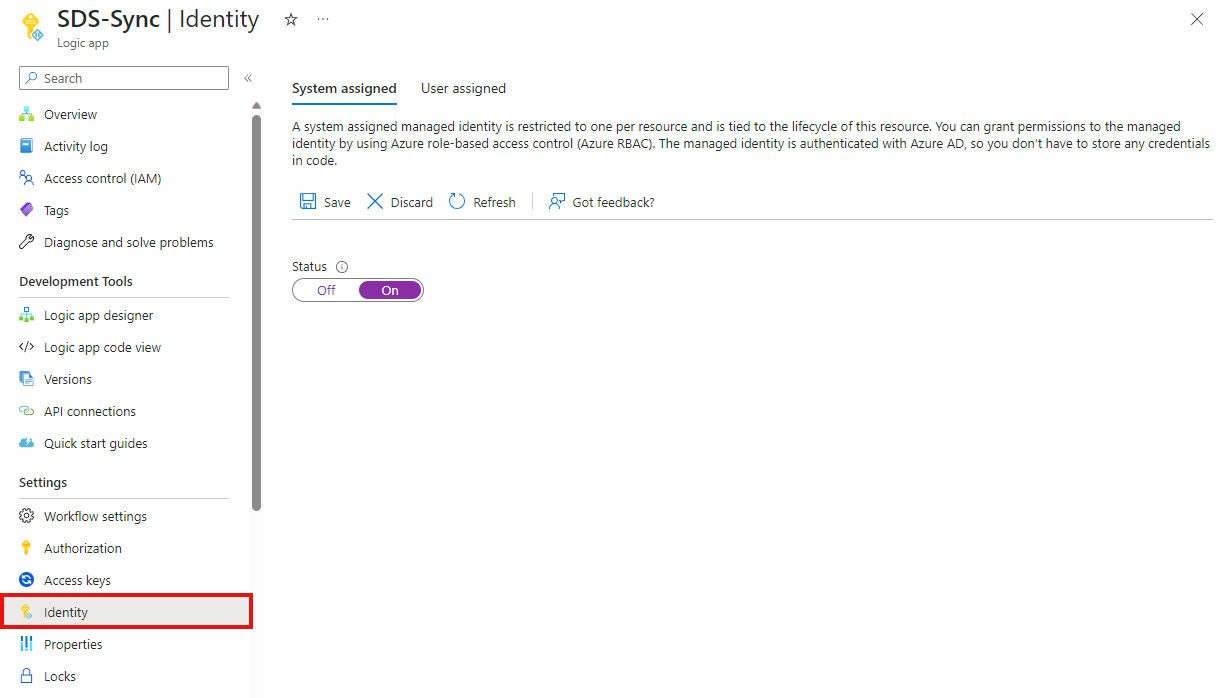
In the background, this will create an identity which the Logic App will use to authenticate to Microsoft resources, and we can assign permissions to.
To assign permissions to Microsoft Graph API, we need to use PowerShell. There is a Stack Overflow answer here which details the script that needs to be run. I have adapted it below.
On Line 1, change 'YOUR-TENANT-ID' for your Microsoft Azure Tenant Id (finding your Tenant Id). On line2, change the 'LOGIC-APP-NAME' for the name if your Logic App, i.e. 'SDS-Sync'.
The permissions that the Logic App needs is just 'EduAdministration.ReadWrite.All', and the GraphAppId is a constant '00000003-0000-0000-c000-000000000000' for every Microsoft Azure Tenant.
Run the Powershell script below to assign permissions:
$DestinationTenantId = "YOUR-TENANT-ID"
$MsiName = "LOGIC-APP-NAME" # Name of system-assigned or user-assigned managed service identity. (System-assigned use same name as resource).

$oPermissions = @(
  "EduAdministration.ReadWrite.All"
)

$GraphAppId = "00000003-0000-0000-c000-000000000000" # Don't change this.

$oMsi = Get-AzADServicePrincipal -Filter "displayName eq '$MsiName'"
$oGraphSpn = Get-AzADServicePrincipal -Filter "appId eq '$GraphAppId'"

$oAppRole = $oGraphSpn.AppRole | Where-Object {($_.Value -in $oPermissions) -and ($_.AllowedMemberType -contains "Application")}

Connect-MgGraph -TenantId $DestinationTenantId

foreach($AppRole in $oAppRole)
{
  $oAppRoleAssignment = @{
    "PrincipalId" = $oMSI.Id
    #"ResourceId" = $GraphAppId
    "ResourceId" = $oGraphSpn.Id
    "AppRoleId" = $AppRole.Id
  }

  New-MgServicePrincipalAppRoleAssignment `
    -ServicePrincipalId $oAppRoleAssignment.PrincipalId `
    -BodyParameter $oAppRoleAssignment `
    -Verbose
}
Once the PowerShell script has completed, you can verify the permissions have been set by searching for your app name under Enterprise Application in Entra ID (formally Azure AD), clicking on the App Name, and reviewing the 'Permissions' page. Note that the portal may take a few minutes to update with the permissions added from PowerShell.
The requesting identity is missing required permissions. Required permissions: EduAdministration.Read,EduAdministration.ReadWrite,EduAdministration.Read.All,EduAdministration.ReadWrite.All
This means that the permissions haven't been applied correctly
Build the Logic App
Once the Managed Identity has been setup, you can do back to the Logic App designer and start building the Logic App workflow.
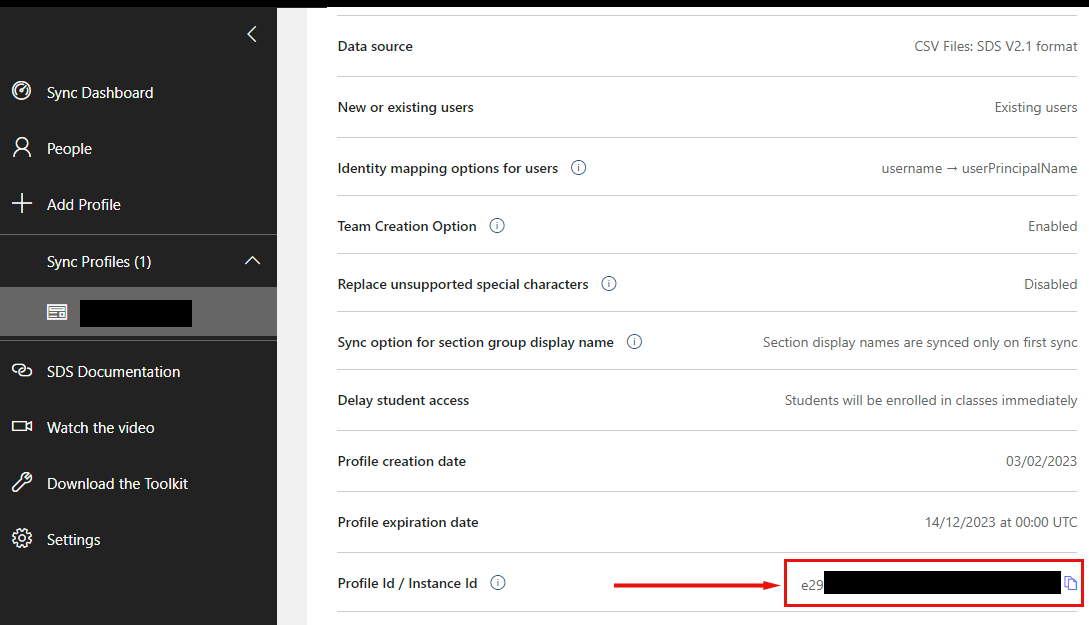
Firstly, we want to specify the Id of the SDS profile we want to update. You can get the SDS Profile Id from the SDS Admin Centre, clicking on the required profile and copying the GUID in the 'Profile Id / Instance Id' row.
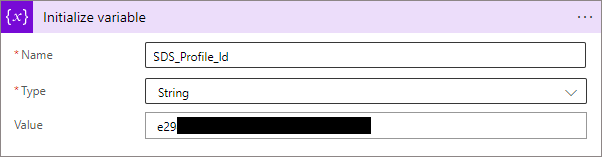
In the Logic App, create a new Step, and select 'Initialize Variable'. Name the variable 'SDS Profile Id', select 'String' as the type and paste your profile Id in the 'Value' text box:
In the future, we can automate this by getting the Profile Id from the Microsoft Graph API and filtering depending on the start and end dates.
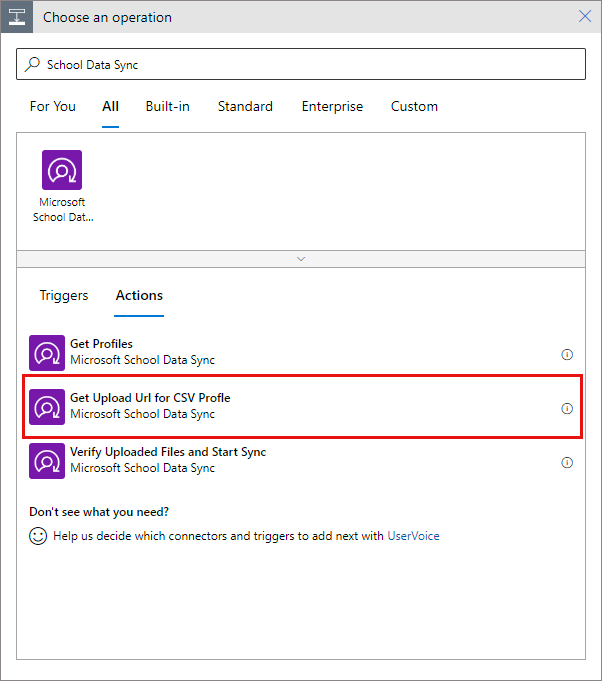
Next, we need to get the Upload URL for the SDS Files. SDS uses Azure Blob Storage to upload and store the files and uses a Shared Access Signature to authorise the upload (PUT) request. A Shared Access Signature is a query string that is appended to either a blob or container URI. When requesting an upload URL from the SDS API in Logic Apps, it will return a container URI which is a GUID, with the SAS query string appended to the end. This gives us a short-lived token to sign our upload requests.
To retrieve the SAS Signed URL from the SDS API, add a new step, search for 'School Data Sync' and select 'Get Upload Url for CSV Profile'
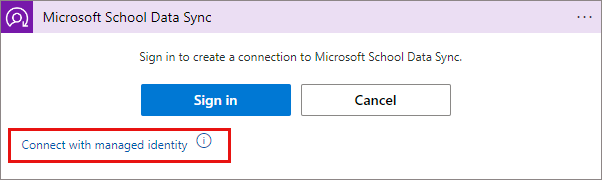
Select 'Connect with managed identity' if you're using Logic Apps and Managed Identities (or Sign in if you're using Power Automate):
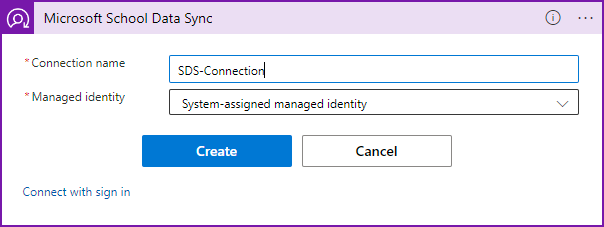
Name the Connection and press 'Create':
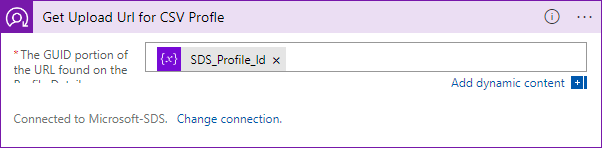
Once the connection has been created, under the GUID textbox, add the SDS Profile Id variable you created earlier:
As mentioned earlier, the Upload URL is returned as a container URL with the SAS query string appended, meaning that the '?' is the delimiter, ie:
https://sdsprodusencryptedcsvstg.blob.core.windows.net/099b7b98-8c02-4c93-83ff-59ab897b90a6?sv=2018-03-28&sr=c&si=SharedAccessPolicy_123456789&sig=39Up9jzHkxhUIhFEjEh9594DJXe7w6cIRCgOV6ICGS0%3A377&spr=https&se=2023-07-07T00%3A01%3A02Z&sp=wTo be able to split this so we can append the CSV file names, we need to split the URL into two parts, the container URL (everything before the ?) and the SAS query string parts (everything after the ?).
To do this, add a new step to 'Initialize Variable', enter a variable name (SAS Url Parts), select type as 'Array' and enter an expression which splits the returned URL above into parts:
split(body('Get_Upload_Url_for_CSV_Profile')?['value'], '?')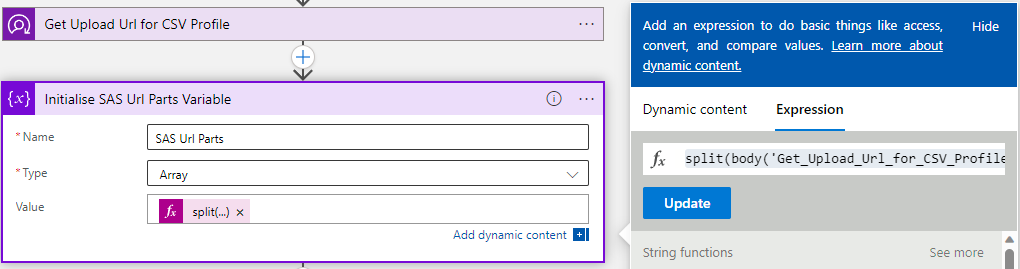
Now we have everything required to start retrieving data and uploading it to SDS.
For each of the required files (orgs.csv, users.csv, roles.csv, classes.csv and enrollments.csv) we're going to execute the database to retrieve the data, format the data into a CSV, issue a PUT request to upload the data to the SDS Blob Storage.
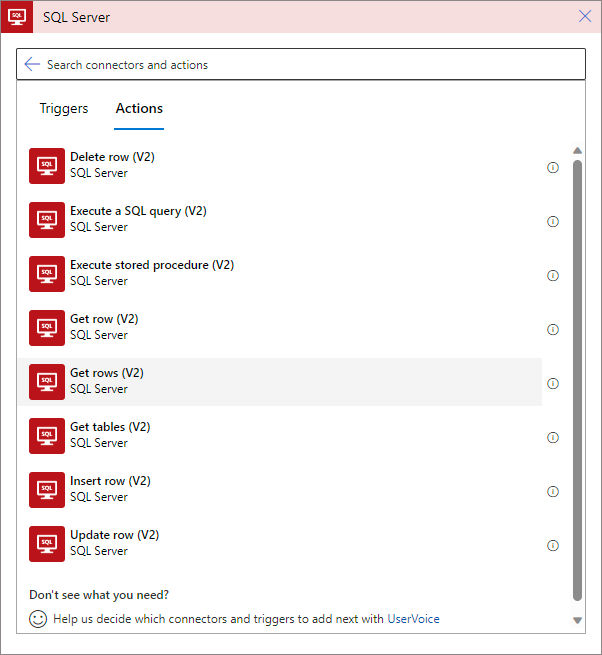
To get the data, click 'Add new step', search for the 'SQL Server' category and select 'Get Rows (v2)':
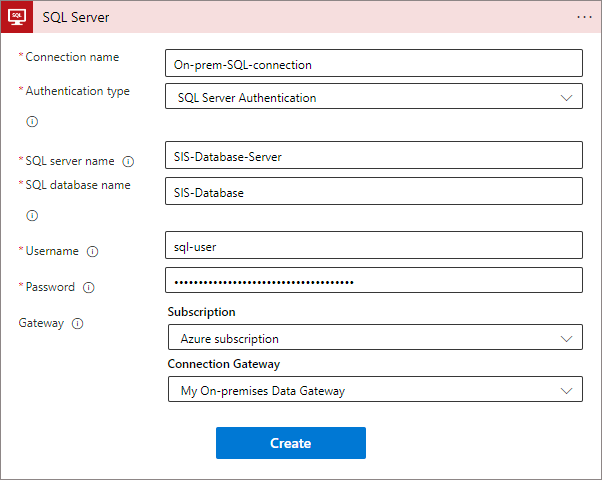
On the next step, fill out the data to connect to your database and select your on-premises data gateway:
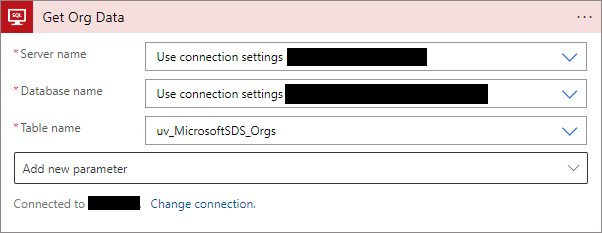
Once the connection has been created, you can now select the view which contains our organisation data, in our case it's uv_MicrosoftSDS_Orgs. The dropdown will let you select from a list of views or tables available:
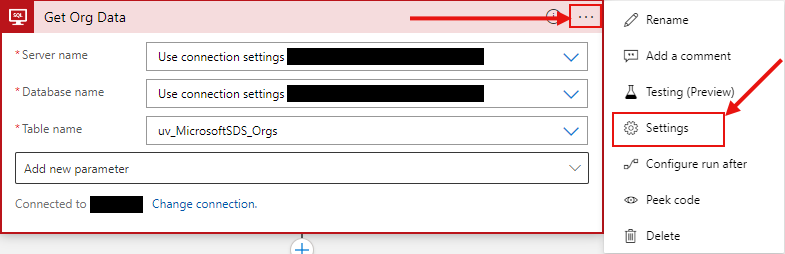
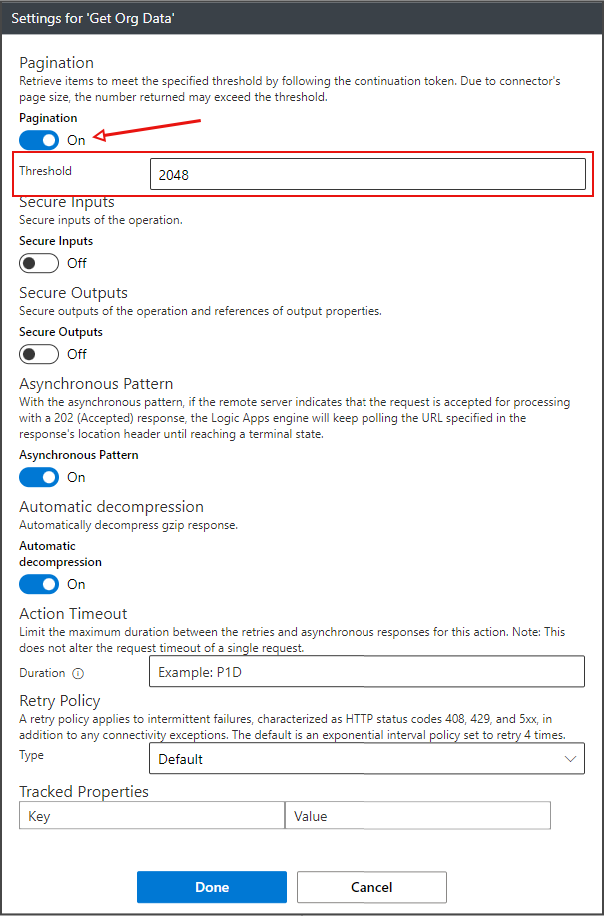
By default, Logic Apps will only return a maximum of 2048 rows from each query, so if your views return more than 2048 rows, or are close to that limit you will need to enable pagination on the queries. To do this, click the ellipsis on the top right of the 'Get Rows (V2)' step, and click settings:
Then, under settings, turn 'Pagination' on and then increase the threshold to be sufficient for your data both now and in the future:
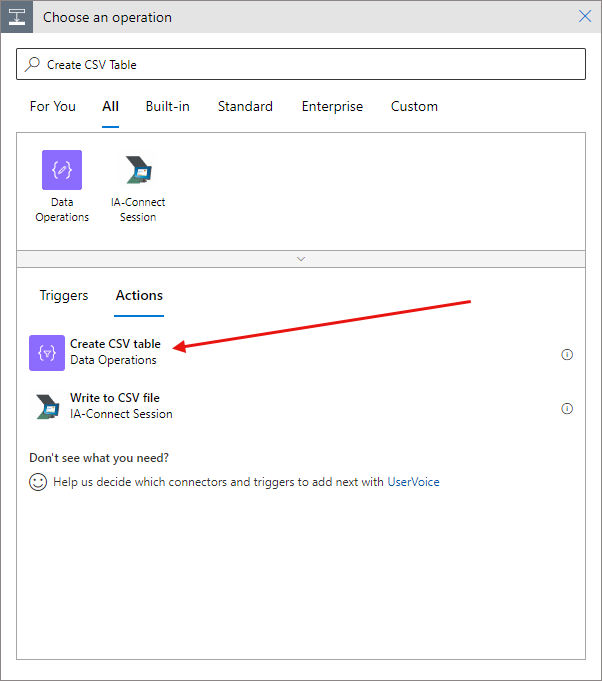
Once we have the data from our SQL Database in Logic Apps, we need to format it in CSV format. Logic Apps has a 'Create CSV Table' operation we can use for this.
Click 'Add a step' and search for 'Create CSV Table', and select the 'Create CSV Table' operation under the 'Data Operations' category:
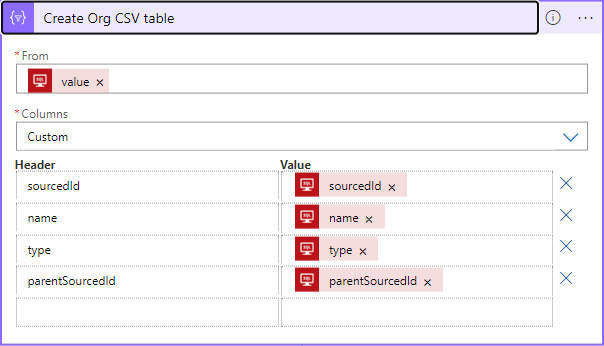
To create the CSV table, in the 'From' text box select the Dynamic Content which corresponds to the output of the database query, for columns, select 'Custom', and then map each column as per the Microsoft SDS CSV spec:
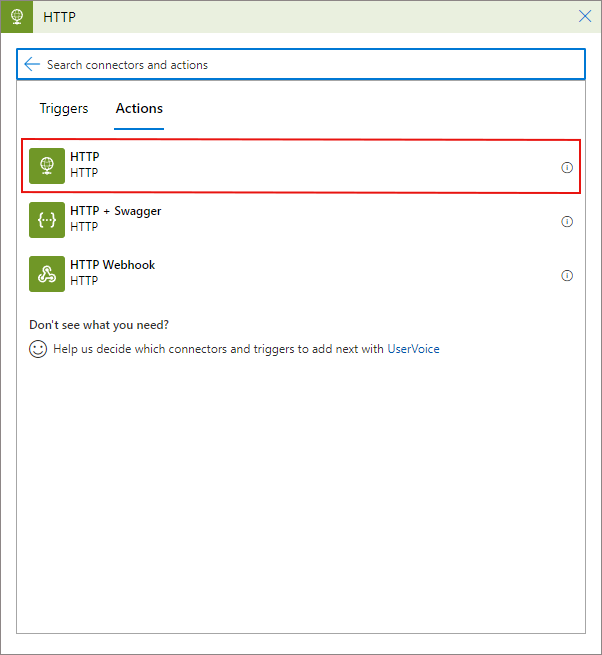
Next, we need to upload the file to the Microsoft SDS storage service. TO do this, add a new step and search for 'HTTP', and click on the HTTP category:
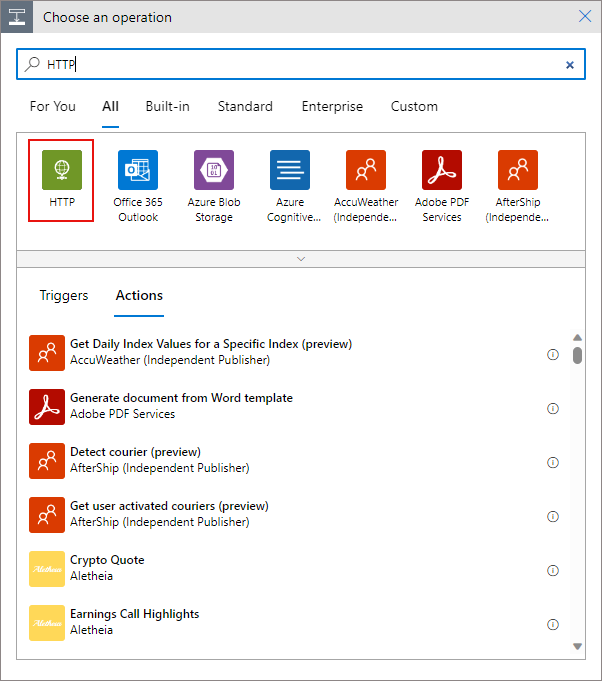
Select 'HTTP':
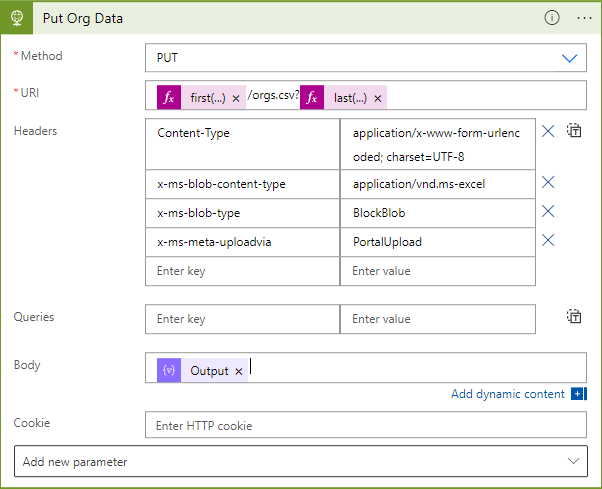
When the HTTP step has been added, set the method as 'PUT', and we need to build the URI from the array variable we created earlier. In the URI field, Insert an expression:
first(variables('SAS Url Parts'))then add the name of the file prepended with a forward slash, e.g. '/orgs.csv' for the orgs file, and then add another expression:
last(variables('SAS Url Parts'))Your URI field should now look like this:

We need to add some custom headers to enable Azure Storage and SDS to process the request correctly. Enter the following:
| Key | Value |
|---|---|
| Content-Type | application/x-www-form-urlencoded; charset=UTF-8 |
| x-ms-blob-content-type | application/vnd.ms-excel |
| x-ms-blob-type | BlockBlob |
| x-ms-meta-uploadvia | PortalUpload |
Finally, in the 'Body' field, enter the output from the CSV table operation from the Dynamic Content list.
By now, your HTTP request should look like this:
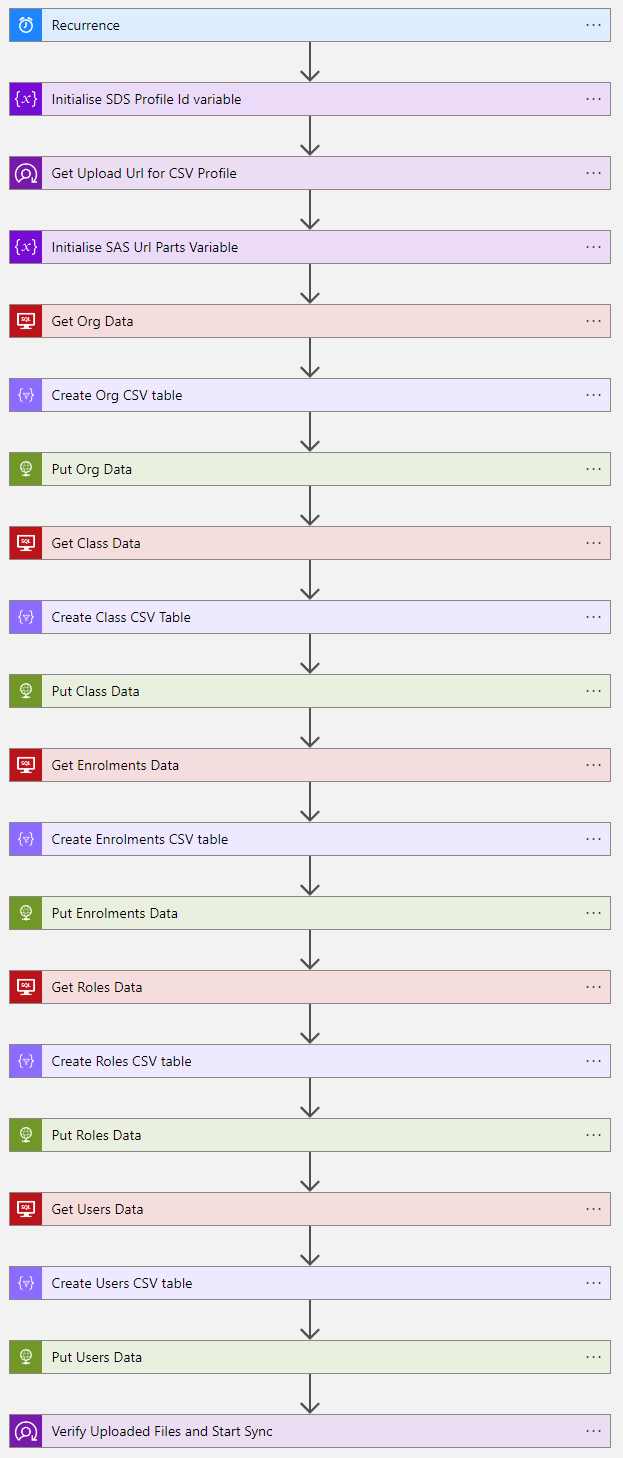
So we have our Logic App retrieving our organisation data (org.csv), formatting as a CSV and uploading it to the SDS Storage account. Repeat this for each of the CSV files that you want to upload (classes.csv, enrollments.csv, roles.csv, users.csv and any other optional CSV files).
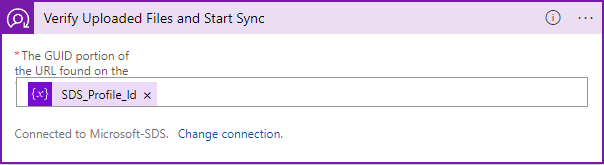
Finally, once all of our CSV files have been uploaded to the SDS storage account, we need to trigger the verification sync process.
Add a new step, search for 'School Data Sync' and select 'Verify Uploaded Files and Start Sync':

In the data operation, under the GUID portion text box, enter in the variable with your SDS Profile Id that you defined above:
and that's it! The Logic App should now look similar like this (depending on the data you are syncing):
Click save and 'Run Trigger' to test out the trigger and ensure that it gives the required result.
The next steps would be to get the Profile Id from SDS automatically and we could also add some checks from our student information system to only sync when the current date is within the defined term/semester dates and the SDS Profile is active.